
*click on the pictures to make them larger
 I searched traditional Norwegian costume and bunad before making this costume. All the different bunad I came across are so pretty! A bunad dress and coat are originally made from wool, shirt is linen or cotton, lots of embroidery details (Rosemåling decorative art was used for Disney’s Frozen outfits), and they wear silver (halssøljer=the neck closure silver, there are interesting jewelry to look at for inspiration on the heart closure). In the end of my search I decided I wanted the costume to look comfy and handmade look. My costume is not perfect but I hope these tips/ideas help you make your Anna costume!

☆ Wig
I bought a strawberry ginger blonde wig at eBay. It’s a nice color and soft, but it wasn’t orange enough so I added orange sharpie by hand. This photo shows the real color and the photo on the right is a bit more orange. I had to make the side parting, the wig was originally parted in the middle. I sewed on a weft from Irisviel’s wig about where the parting starts.

 ☆ Cloak
I don’t like to spend a whole lot on cosplay, so I looked for a similar texture to wool (wool is expensive) which is flannel. I brushed the fabric to make it somewhat look like wool lint. I drafted my own patterns for the cape, the top part was time consuming. All the applique details were cut from Alexander Velvet Cannes Wine fabric (found in my fabric box and this fabric is discontinued at fabric.com). It’s top stitched to the cape and the 115 semi-circles are hand sewn plus the pink embroidery (DMC) details. The cloak is lined with charameuse satin red fabric (found in my fabric box). The poms were originally pink, I dye them with violet ritdye for polyester. It didn’t turn completely violet. I must have done something wrong, so I had to somewhat hand paint them. The long part of the cloak is hand stitched to the short top part of the cloak.
 ☆ Clasp
The silver heart closure is made out of super sculpey and the details are carved in with a pencil. Once baked I painted it silver, weathered it, and added lots of varnish. I also added a bit of silver with a metallic silver pen (not shown here). Behind the clasp there’s a hook and eye closure on the cloak for extra strength for closure.
☆ Bodice V2


The old bodice no longer fit so I cut my old bodice to use it as a pattern for my new bodice. I used Stretch Velvet and a brown/gold Offray ribbon this time. It’s much more comfortable to wear and the length of the bodice is about right! I also used the same embroidery from the old bodice by cutting it carefully around the fabric and I pasted to the new bodice using fabric glue.
☆ Bodice V1 and long sleeve shirt

I used the same kona cotton sage fabric from Kozue’s for the long sleeve shirt. The vest I used the back side of Bijoux Faux Leather Textured Black, left overs from my LR costume. I made my own bias tape from the gold fabric left overs from my sister’s Saber costume. All the embroidery is done by hand. I suggest to look at this site: Embroidery 101 for embroidery help, it worked for me! For the design on the back of the vest I looked at Disney Park’s costume for reference.
 ☆ Skirt
I wished I had bought more yards to make the skirt flow more and add more panels, but it’s about right. I did have issues with the fitting which was a bit too tight. I used navy and sky blue flannel for the skirt. The embroidery was also done by hand and it took forever! You can take a closer look at my embroidery on the left photo. I love the way hand embroidery looks.
 ☆ Underskirt and pants
I used the silky backside of white fur fabric (also found in my fabric box) for the inside skirt, it makes me feel warm! I painted the designs with silver Tulip’s dimensional fabric paint. Here’s a closer look of the design on the white skirt from the movie: white underkirt. I used sky blue jersey fabric for the pants, it’s really stretchy and soft material . The applique designs were all drawn out, cut out, and heat n’ bond to the pants. I added white crochet for embellishment. Here’s a closer look at the details: pants1, pants2.


☆ Hat
For the hat I used the same flannel color of the cloak, leftover purple fabric for the trim, and lined it with leftover red velvet fabric. The fur was a Tinkerbell fur from Jo-Ann that had silver shiny stuff on it. I had to take off all the silver out of the fur. Here’s a rough drawing of how I made my hat. A closer look at her hat design: design.
 ☆ Mittens
For the mittens I used blizzard fleece fabric. It was the easiest part of the costume. Here’s a rough sketch of how I made them in a simple way. Also, a closer look at the embroidery on her mittens: design. I later added the missed detail on the back of her glove, I pasted a darker blue color flannel with fabric glue (left image).
☆ Boots
The boots were originally brown cowboy boots. I had to cut the inside to stretch the boot tall. They are painted with a mixture of black and textile-medium paint and the gold design I used Tulip’s dimensional fabric paint.
☆ Eye contacts and makeup
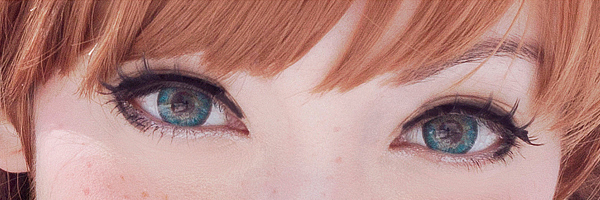 I used QT H-type 3-tone Super Turquoise eye contacts from kiwiberry1-collection. They are comfortable and the color looks great in good lighting. I use E.l.f products for the brushes, blush, freckles, and eyeliner. I use Ben Nye for the foundation. The eyelashes are from eBay (Search: specialized made by hand entirely), it comes with many packs of different types of eyelashes.
-C

Which Ben Nye foundation are you using? It looks flawless. Please do a make up tutorial!!!
Color cake foundation: PC-40 Shinsei Ivory
Someday~
Btw: you and your sister are amazing and I’m in love with practically all of your costumes and construction notes.
Aww, thank you!
You made the hat look so easy 😐 How did you get it to fit. Whenever I try to draft the hat myself it comes out too small or too big.
Hey!:D I first made the pattern (like the one I drew), cut out the pattern, pin the pieces together. Then I placed the pinned hat on my head to see if it fits. If it’s too big, I make the pieces smaller. Once it fits then I finally sew the pieces together. I forgot to mention, there’s a string at the end of my hat and I tie it behind my neck.
I think I may have the same wig as you for Anna, but I found that the curls were tangly when I tried brushing them Did you straighten the wig first? and any tips on plaiting the hair into pigtails? cause I found the back of the wig for me always looks messy 😦 thanks amazing cosplay btw 🙂
Hi, my wig was wavy at the ends. It didn’t get tangled when I brush the wig. When I braid I kind of make it loose. I straighten the ends which I regret, if you want to straighten it please try out a strand first! I recommend low heat setting.
And thank you! 🙂
Thanks for the reply 🙂 what kind of products do you use for styling your wig?
No problem 😀 I usually use got2be spray to keep the style, but recently I’m having trouble finding that spray in the store, so I use TIGI’s bed hair spray which works well too. And I use special hair cutting scizzors.
sorry one last question >//< how did you add the white streak to the the wig? 🙂 Thank u for answering all my questions ❤
I cut a small weft from a white wig I have and sew that piece of weft to anna’s wig at the top. No problem 🙂
Hey, that looks amazing (I love frozen!). Just one question, how did you do the boots?
Oops, sorry, missed the bit where you said how to do the boots!
You look so gorgeous here, may I know which E.l.f blush you’re using? 🙂
Thank you, I used the color Fuchsia Fusion: http://www.eyeslipsface.com/studio/face/blush/studio_blush
Thank you!! ❤️
You’re welcome!:)
And sorry, which lip colour you’re using? 🙂
I used New York Color 416 Berry Rich and a tad bit of Skin Food Vita Tok lipstick OR02 on top.
how much did the anna and elsa cosplay cost overall? (by the way you and your sister look amazing!!)
Hi, thank you! Overall including wig, fabrics, and shoes: For Anna’s travel outfit it was about $60ish and Elsa’s ice dress was about $80ish, keep in mind we had most of the fabrics, paints, and sculpey for Anna in our fabric/tool box while Elsa’s required yards of fabric and lots of glitter. We also had Elsa’s wig so that too is not part of the budget. Coupons and sales helps a lot when you go fabric shopping!:D
Olá, onde posso encontrar uma peruca igual a sua? Só acho com cores diferentes a da personagem!(Hello, where can I find a wig like yours? I just think with the different colors of the character!)
Hi, here: http://www.ebay.com/itm/200967149833?ssPageName=STRK:MEWNX:IT&_trksid=p3984.m1497.l2649
Hi can you please help me understand what you mean by “sewing in” the weft to make the part in the wig? Was it an entire track or just a little piece? Hand or machine sewn? I keep messing up everytime I try to sew in wefts. Any advice?
It’s a little piece of weft, really small and I hand sew it on top of the wig where the parting is at.
How did the hat keep in shape? Did you have to add boning in it?
Btw, you’re both incredibly talented!
No, it somehow kept it’s shape with the fabric I used xD
Thanks!
I would really like to know how you made the Clasp
So forgot to say that you look very beautiful
Hello, thanks! The constructions notes about the clasp is above. After reading it and you have more questions you may ask ~
Hi! I so admire your costume work. Fantastic! I was wondering if you could elaborate on how you sewed the scalloped bottom of the skirt. Thanks!
Thanks^^ The darker blue fabric is top-stitched to the already cut scalloped bottom before sewing the whole skirt together.
Hi, I’m currently trying to make this costume but with very little experience and no heavy duty equipment. How would you suggest I go through with this project? It’s for ashadow screening of the movie so I would like for it to be pretty accurate. Are there any links useful that you used or a more specific step to step instructions that you have for this costume? Thanks!
Hey, I would suggest looking into buying the Simplicity Frozen pattern: http://www.simplicity.com/p-12169-disney-frozen-costumes-for-misses.aspx. At the time when I started this costume the pattern didn’t exist so I made my own patterns. Also, patterns are easy to use 🙂 ! I don’t have a step to step instructions. I tried to explain what I use and I included some drawings of patterns like the hat. Things like how to make bias tape, embroidery (look at link in the notes), or circle skirt, you can find useful tutorials through google.
When making this costume I stared at the movie for details and searched about traditional Norwegian costumes.
Good luck!~
how much did this cost you in total?
I don’t remember the exact cost, but around $100+. I try to stay cheap, coupons at Jo-Ann are really helpful 🙂
What embroidery thread did you use & in what colors?
Hey! I don’t remember what colors they were, but I bought the DMC brand at Jo-Ann Fabric and Craft Store.
Hi! I already have all my Anna outfit, except the hat. I would like to make myself one, but I’m still a beginner at making costumes and sewing. I was wondering if you could tell me exactly how you made your hat, because I really like the way you made it. Thank you!
Hi, sorry for the late reply! I always start with making my own patterns, pin the fabric together to see if it fits nicely, then sew. I’m not perfect at sewing, so it’s all trial and error. I have a sketch above in the construction notes that may help 🙂
looking for a Anna cape and hat would that be something ya’ll could sell already made?
Sorry, we only do wig commissions.