
*click on the pictures to make them larger

- Wig
I got it from koreahomme at eBay, but I don’t trust this seller 100%. This seller uses pictures from other sellers and one of my friend did not get the same wig as me.
- Hair-Tie
Given to me by ShallDoll. She’s wonderful at making these kind of stuff and she’s selling Serah’s hair-tie! I went with the pink version based on this render.
- Pendant/Necklace
 I made this out of Sculpey Polymer Clay in white. It will take practice to get the shape you want. I used Chrome Metallic Spray Paint and Testors Enamel Gold paint. The ring, diamond, and other little accessories were savaged from my old necklace. You can buy these accessories at a craft store or make it yourself.
- Design & Writings on Front and Back of Dress
The plate on the front side of the dress is made out of craft foam and painted with Mod Podge, enamel paint and then varnished. I shaped the craft foam a bit with my hands and with the help of hot glue.
The Etro Script on the plate is very hard to see. I used a small brush to write it out and it didn’t come out the way I wanted it to. I only got the first line and I believe they mirror each other (Please tell me if I’m wrong):
Aroirp Priora (Priora meaning Prior in Latin) *OR* Saecula Priora (meaning The Former World in Latin), thanks to ilovezsora
![]()
The second and third line I have no idea.
I only got the last line on the back of the dress as well (Please tell me if I’m wrong):
Magit Igam (Magit meaning More in Latin)
![]()
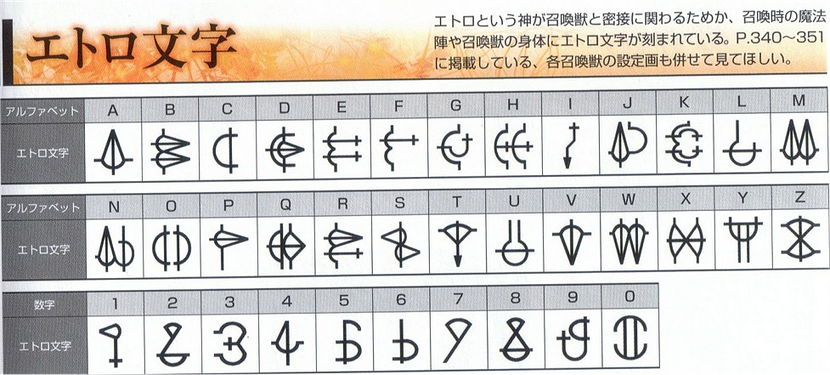
I used these references for the Etro script when playing the game: Image 1 & 2
For the applique design on the back side of my dress I used the shiny and matte side of gold metallic spandex. I fused the applique with heat n’ bond:

For the rivets on the front and back side of the dress I used hot glue and painted them with enamel paint. Ignore the purple and black top stitch they were later painted with the rest of the leather to a ruby red color. The straps are easy to do in my opinion, so I won’t explain how I made them:

- Top
It’s made out of Neoprin (scuba) material. It’s a very easy and stretchy material to use, but you can use any kind of fabric that has stretch to it. Neoprin is quite expensive and the store I get it at doesn’t always have plain white. I lined the top with the same fabric because there was a bit of transparency.
- Dress with Panels and Straps
Here’s a diagram/drawing I made. It is super ghetto:


All the straps were sewn onto the dress. The pink fabric is a stretch fluid jersey knit lined with purple supplex fabric. At the right side of the white top with straps I sewed a coat metal zipper (see red oval on my picture). I sewed the dress to the white top as well so it won’t slip/move around. I finished the side panels separately first before I sewed it onto the dress. I sewed the ruby red leather strips to the white Neoprin side panels. The leather strips was a dark purple color at first, but I painted the leather with a mixture of ruby red acrylic paint and textile medium. The metallic gold spandex strip were sewn on top. The purple-pink transparent organza fabric on the middle of the side panel was hand sewn later on (not shown in picture). The design on the gold strips were done by drawing a black thick line with Sharpie and fusing square gold spandex appliques with heat n’ bond. Then I sewed the completed side panels, I got help by using my sister as a model to get a close to perfect tight fit (I poked her many times with the straight pins oops). The red dashes on my picture above shows where I sewed the side panels.
- Pouch
I used my old pouch from my v1 outfit. The only difference was the design of the golden fastener and painting. The pouch was constructed with foam that was from a playhouse.
I made the shape of the pouch first, by cutting the foam up and hot gluing them together. I added metallic paper at the sides and weathered them. The gold detailing on the bag was done by my twin sister. She used craft foam, primer, and gold acrylic paint. The gold rivets are made from hot glue and a needle went through the middle to make holes in them. The teal part is a teal stretchy fabric and the square designs are made with black fabric paint. The light blue fabric covers most of the pouch and I made a flap so the pouch can be functional.
The pink jewel in the middle of the gold fastener was made out of craft foam, hot glue (raised detail), and painted with acrylic paint. The gold strings and golden fastener were made from craft foam as well.
The gold bands (belt) attaches to the pouch via Velcro and is made out of vinyl with craft foam sandwiched in the vinyl, and painted with gold acrylic paint. The accessories hanging on the gold bands were made out of craft foam, golden chain, and green & gold shiny beads. I based it off of the accessories on the cg render.
- Boots
Version 1:

I bought cheap pointy boots off of eBay. They were painted with a mixture of Pebeo Setacolor Opaque Fabric Paint, purple and pink acrylic paint. I was surprised the paint didn’t chip off much, but I’ll recommend mixing textile medium with acrylic paint. The boot has a side zipper to get in and the straps have Velcro on one side. The white Neoprin fabric (it’s suppose to be a very light pink-purple color but I can’t dye the Neoprin) was glued onto the boot.
Version 2:

The base were painted with a mixture of Pebeo Setacolor Opaque Fabric Paint, pink acrylic paint, and textile medium. This time I painted a triangular shape at the tip of the shoe with white acrylic paint mixed with textile medium. I painted purple leather with a mixture of purple, pink, white acrylic paint, and textile medium. I then added a top stitch to the leather and glued the leather to the boots with Instant Krazy glue. The glue bonds to leather very well. The straps connect via Velcro towards the zipper side of the boot.
- Leg Warmers
Note: I made this leg warmer by trial and error so it’s not the perfect method. The diagram below shows how it was sewn together before stitching it to a finished leg warmer.

I cut out a strip of gold metallic spandex and drew on the somewhat Greek design with black sharpie (make sure you don’t draw them too wide since the fabric will stretch). In total their are four strips, two for each leg. Make sure to get the right measurements of your upper thigh, I made mine too short. I cut out thin strips of faux leather for the sides and a thicker one for the top. I cut out strips of white and black fabric as well. I lined the pink jersey knit with the purple supplex and then sewed on the gold and white fabric. Then the thin faux leather strips (leave one side unsewn), the thicker faux leather, and finally the black strip. Sew the remaining side and you got a leg warmer~
Next, I added on the appliques at the bottom of the leg warmer. I printed out her gold wing design from her cg render and I cut it out to be like a stencil. I traced my stencil to the heat n’ bond paper (gold metallic spandex fabric already fused to the heat n’ bond), cut it out, and iron it on to the leg warmer. Make sure you know how to use heat n’ bond – read the instructions in the package. You can stitch around the applique if you want, so you are more safe from it peeling off.
- Gloves & Arm Warmers
For the gloves I used a silky stretch gray fabric (I’m not sure what it was called), they don’t have this fabric in stock at the store I bought it from. I used a black jersey knit for the top part of the glove and a black metallic spandex fabric for the back of the gold detail. I hot glued the gold painted craft foam piece to the black metallic spandex. The band that goes around the wrist is white faux leather and the details on it were hand sewn and glued on.
The top half part of the glove is separate from the glove, so it makes it easier for me to put it on. I have trouble making gloves so here’s a link to an easy tutorial: easy glove tutorial
The arm warmers are simple to make. I cut out a square from the pink jersey knit fabric and purple Supplex and a thin strip of white Neoprin. Sew it all together and done. Mine is about three inches long.
- Armlets
Made out of craft foam. Glued onto elastic band then painted the craft foam with Mod Podge, then enamel paint, and varnish. Xacto knife was used to make the indented design on her right armlet.
- Bow-Blade Weapon

Materials
I had some of the materials already at home. When I went to go buy my materials I only had $20 with me and coupons. I’ll provide sites, but I’m not sure about some of the sizes I got. The only stores I went to are Home Depot and Michael’s Art & Crafts Store.
1. Screw Eyes
2. Brass Plated Cup Hook 1/2″ www.createforless.com/Laras+Br…
3. Wood Man/Game Piece www.createforless.com/Laras+Wo…
4. Small wood Pickle Barrel www.createforless.com/Laras+Wo…
5. Small wood Flower Pot www.createforless.com/Laras+Wo…
6. Gold Paper Fasteners
7. Pink Insulation Foam @ Home Depot for $8
8. Craft Foam in 2mm and 6mm
9. Black and Clear Plastic Folder
10. Krylon Chrome Spray Paint
11. Big and Small Paint Brushes
12. Pink, Purple, Black, and Silver Folkart Acrylic Paint (OPTIONAL, hot pink nail polish for the diamond)
13. Testors Enamel Silver/Metallic Paint
14. Delta Ceramcoat Varnish
15. Mod Podge Matte
16. Hot Glue Gun
17. Black Sharpie
18. Clear Elastic Jewelery Wire
19. Claw Jewelry Clasp
20. Faux Leather (used for v1 arrow, I didn’t have enough materials to use something else) I used craft foam for the v2 arrow instead.
21. Gorilla Glue
22. Sand Paper
23. Fish Tube
24. Suede String
25. Minwax Polycrylic Protective Finish (OPTIONAL, I used it to smooth the surface)
26. Hand-Held Electric Saw (This was provided by my father, it does clean cuts. If you don’t have a saw you can use razor blades or craft knife. The pink insulation foam I got is very thick, be careful when cutting)
25. Machine Screw 1/4″-20×2-1/2″ Round Head Combo
Tips on How I Made My Bow-Blade
Take note, some materials I already had them at home and I did not have to go buy them. I started off with only spending around $20, but during Katsucon the limbs of the bow-blade came off from my own made nut and bolt with glue sticks… they were too weak. I had to go buy machine screws (it chipped off some paint off of my bow-blade where the oringinal nut and bolt was), so my spending went a little over $20.
I drew out my pattern of the bow-blade first. I drew the pattern in separate pieces of paper and taped them together. There are many good references on the web, I remember someone has made a blueprint of the bow-blade at deviantART.
I laid out the cut out pattern on the pink insulation foam. Using a black sharpie I traced the pattern. The limbs, hilt, handle, and arrow were drawn separate. All of the pieces were cut using a hand-held electric saw. I got assistance from my father for cutting it clean, I messed up the first time I tried. I sanded the pieces down with fine sand paper (wear a mask).
The four little legs, whatever you call them, were made out of cardboard plus craft foam attached with gold paper fasteners so they can move.
The handle was covered with craft foam and all the little details on the rest of the bow-blade was made out of 2mm or 6mm craft foam.
Before all the parts were assembled I mod podged and then spray painted, painted with acrylic paint, and varnish.
Then I assembled everything together using hot glue, gorilla glue, screw eyes, brass plated cup hooks, gold paper fasteners, machine screws, etc.
For the handle I used the Wood Man/Game Piece, Wood Pickle Barrel, Wood Flower Pot, and Fish Tube decorated with Suede String.
It’s been long since I made this bow-blade, so this is the best I can explain it. Below are progress photos that can help in making the bow-blade:

![]()
^Here you can see the screw eyes that help in holding the strings. They were dipped into gorilla glue and pushed into the foam for more support. At the ends of the strings are the brass plated cup hooks that attach to the screw eyes. Also, for the little gray tubes wrapped with the strings I used glue sticks.

^Here you can see the Jewelry Clasp. This is how the bow-blade holds together in sword form. You can also see screw eyes here, that’s where the strings attach with the cup hooks. The strings make a sort of “X” shape when hidden behind the blade.
The Etro script on the limbs:
Longe Lateque Aetatum Lumen Illustrans Verum. (Meaning in Latin: Light ages far and wide, illustrating the truth.) Alphabet: Etro Alphabet
I can’t see the tiniest writings on the bow-blade, so I don’t think I got the whole sentence. Here’s what I wrote on the limbs:

You could see how the sentence is ordered here: etro script
-K

Whats the thickness of the insulation foam that you got? I don’t want to get to thick/thin.
Thanks ❤
Hey, it’s about 1 inch thick.
Hi, I was wondering where you bought the fish tube for the handle ? And were you able to get it in the correct shape as Serah’s handle ? Thank you !
Hey, I got it from Home Depot. It wasn’t too accuarate but close enough 🙂
Hi Yuuri-K, love your cosplays! I’m sure you’ve gotten lots of questions about your wig, but would your wig happen to have a “charastars” tag on it? Or does it match the charastars wig for Serah?
Hey 🙂 I looked at the tag and it has Japanese writings on it, and I think it says COSER.
Hey~! Thanks so much for the tutorial, I’ve always admired your cosplays and hope my Serah is half as good as yours! ^^
And based on the “COSER” tag you said you found in your wig, and the photos I remember from koreahomme before they quit eBay (I remember loving your Serah wig on dA when you bought it haha), I found this one on HELLOcosplay:
http://au.hellocosplay.com/final-fantasy-serah-farron-cosplay-wig-p-5244.html
And if I don’t like the one I just bought, I’ll be buying that one 🙂 I think it might be the same wig! 🙂
I hope you like the wig you’ll receive 🙂
Thank you so much for Writings on Front and Back of Dress. I found it a long time ago. Thank you
You’re welcome!
Hi, what did you use to make the blades move? And where did you put them? Thank you 🙂
Hey, it’s been so long ago… but I think the Machine Screw 1/4″-20×2-1/2″ Round Head Combo is what I use to make the blade moves. Sorry, I don’t clearly remeber if that’s all I used.
Thank you! You have made a phenomenal costume 🙂 I am making one right now and I hope it comes out as great as yours 🙂